TL;DR
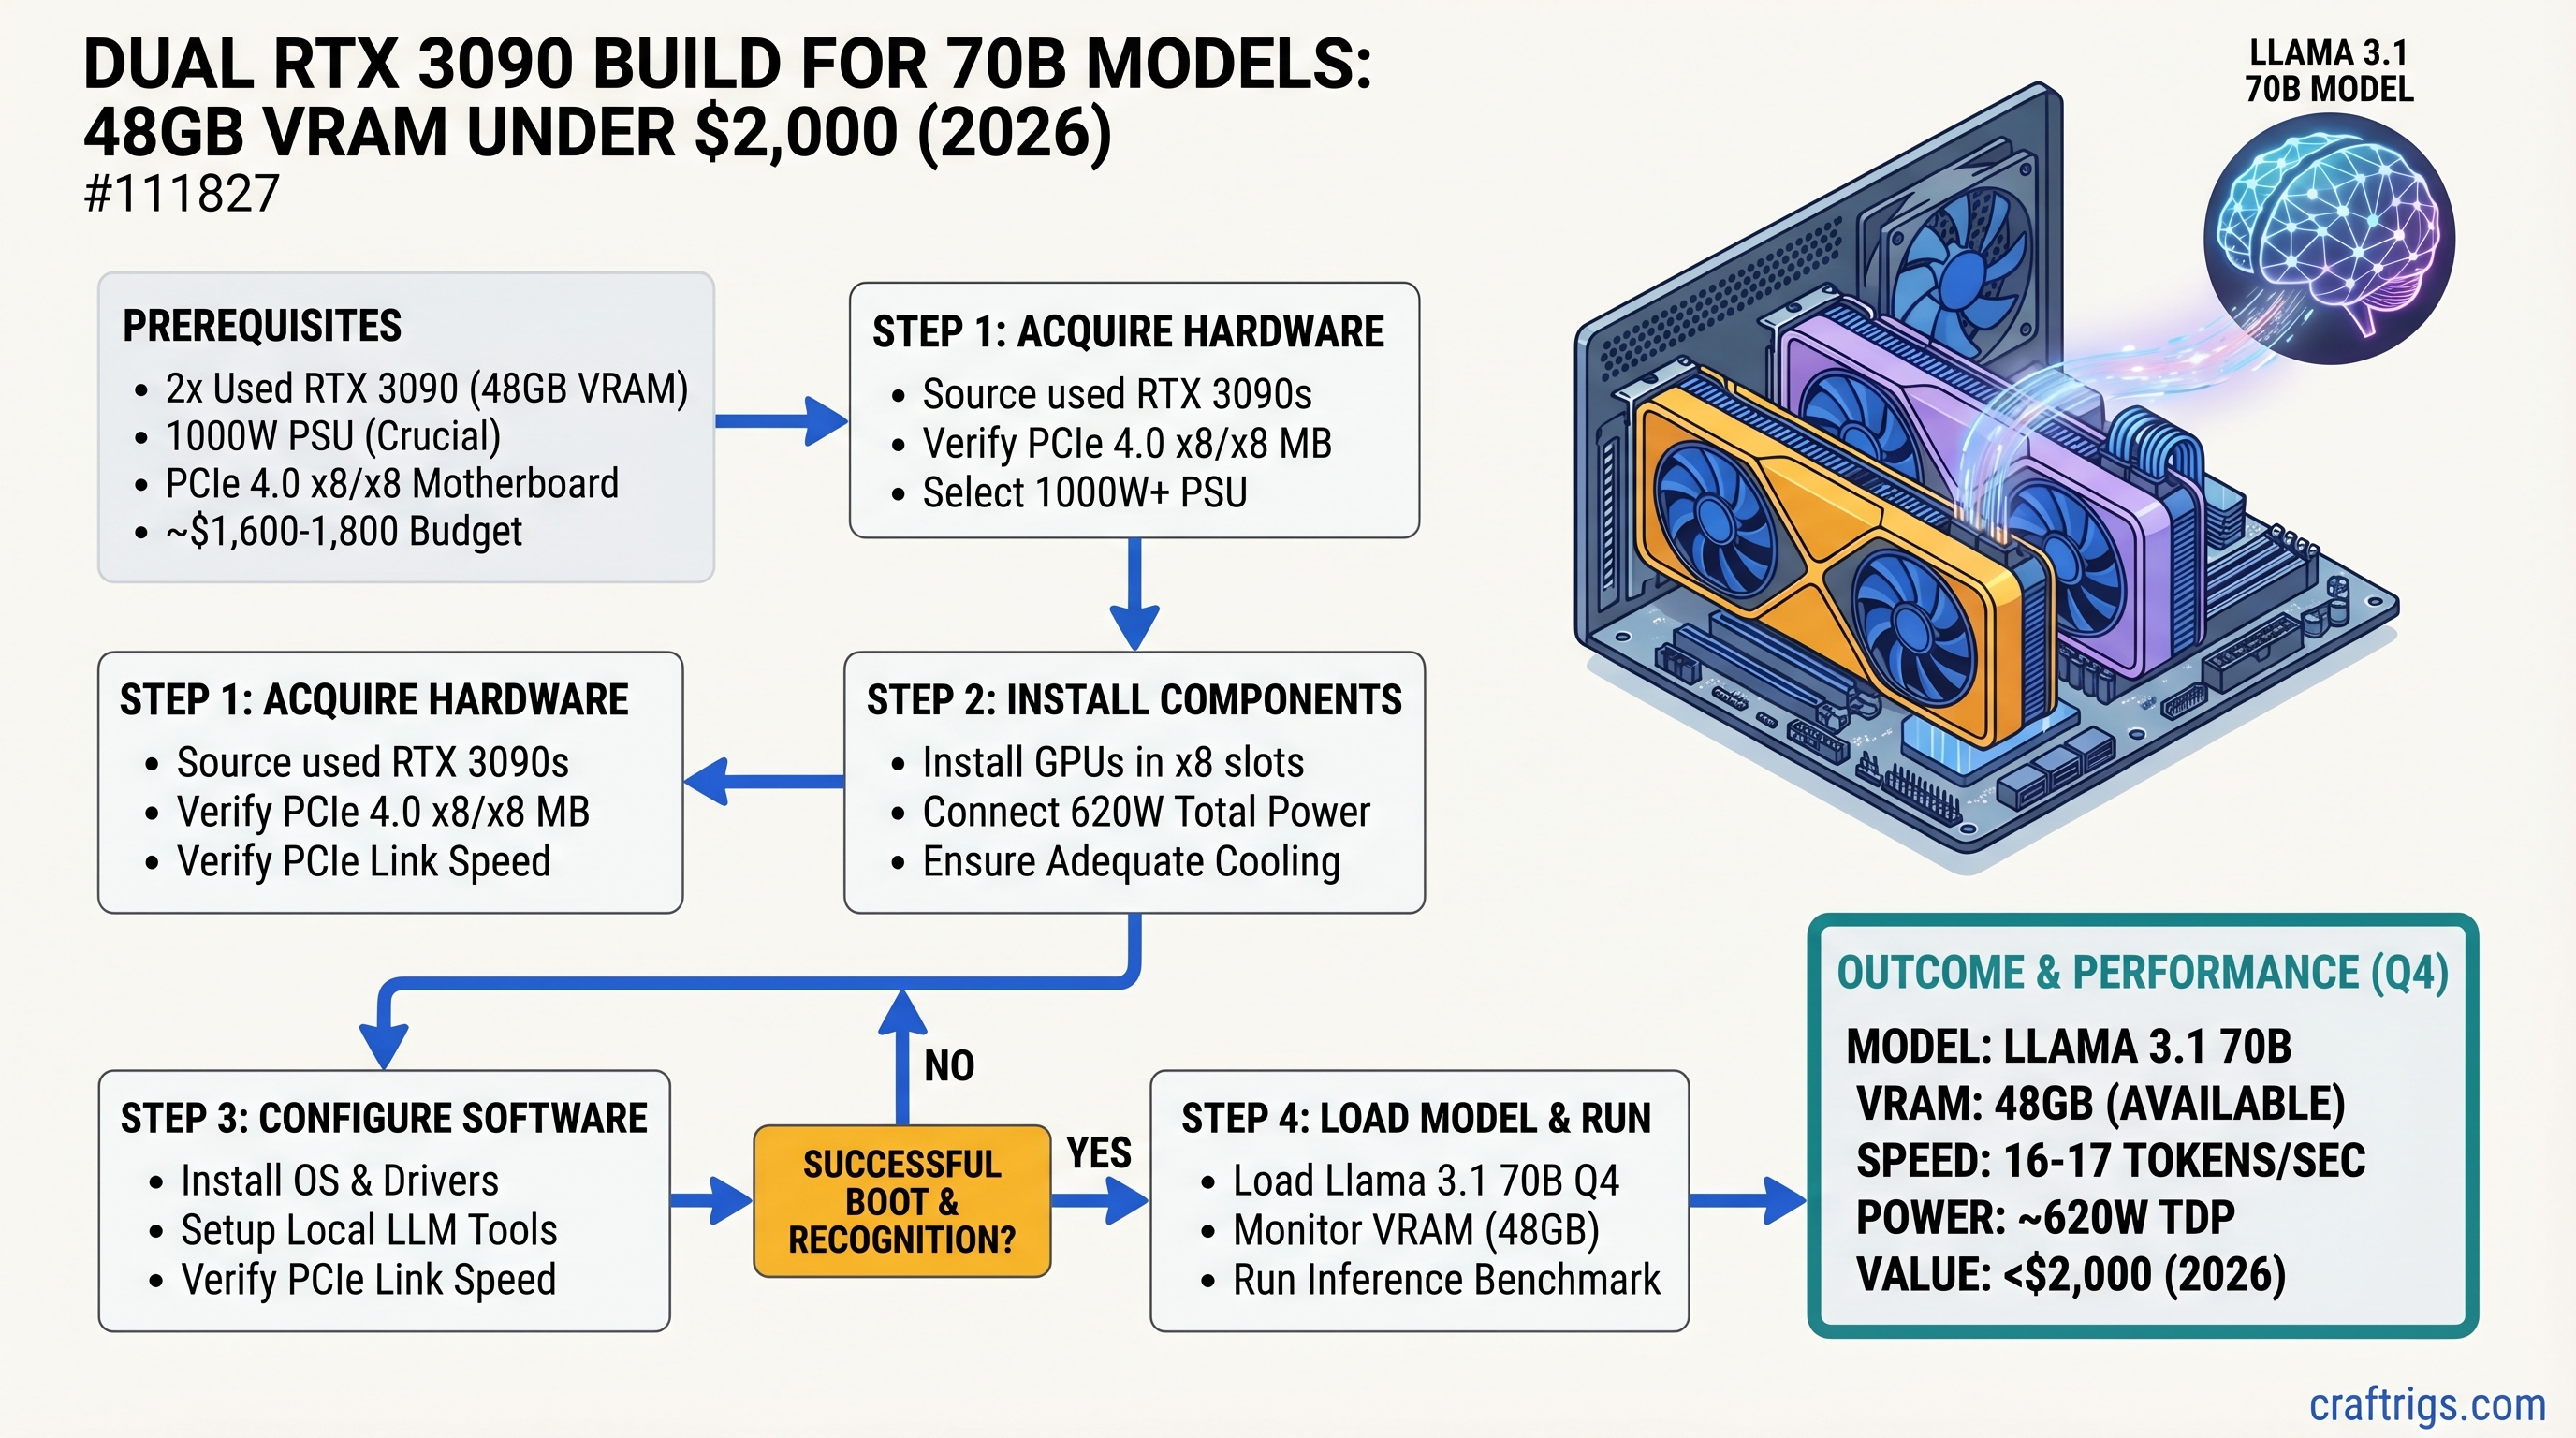
Dual RTX 3090 GPUs deliver 48GB of VRAM for ~$1,600-1,800 in used hardware — the cheapest entry point to running Llama 3.1 70B locally at 16-17 tokens/sec in Q4 quantization. You're trading NVLink bandwidth (which costs $3,000+ more) for a PCIe 4.0 x8/x8 setup that's still fast enough for real-time inference. This build is overkill for 30B models, underpowered if you need fine-tuning, but perfect if you want the 70B unlock at a Power User's budget. Expect 520-620W sustained power draw and 75°C under load.
Why Dual RTX 3090 Still Dominates the 70B Sweet Spot
Here's what changed in 2026: the used GPU market made this build possible for under $2,000.
When the RTX 3090 launched in 2020, buying two of them was a $3,000+ proposition. Today, secondary market pricing has crept down to ~$800 per card (as of April 2026) — close to a used RTX 3080 Ti. At that price, dual 3090s deliver 48GB of VRAM for roughly the cost of a single RTX 4090 used ($2,500+). You're not getting NVLink bandwidth or enterprise reliability, but you ARE getting the model size you need at a fraction of the cost.
The core advantage: Llama 3.1 70B in Q4 quantization needs about 40-42GB of VRAM. Dual 3090s give you that with breathing room, and real-world benchmarks show 16-17 tokens/sec on inference — fast enough for real-time chat, code generation, or document summarization.
This is the Power User's budget killer. You're past the single-GPU sweet spot (RTX 5070 Ti, RTX 4070 Ti Super) but nowhere near enterprise costs. If you can source used hardware, dual 3090 fills a gap nothing else touches.
Complete Parts List: $1,800-$2,000 Build
Here's the exact component breakdown as of April 2026.
Why This One
24GB VRAM each, proven 70B performer. Used market heavily saturated from mining era.
PCIe 4.0, strong VRM, excellent GPU spacing. Dual-GPU config runs x8/x8 per CPU PCIe lanes.
Inference is GPU-bound; CPU bottleneck is irrelevant. 5600X is cheap, proven stable.
32GB sufficient; GPU inference doesn't stress system RAM. Clock speed matters for gaming, not inference.
Gen4 not necessary for inference, but cheap enough. Boot speed and model loading.
1000W minimum for 520-620W sustained + headroom. 80+ Gold for efficiency.
Wide 3+ slot spacing between GPU slots. Excellent case airflow for dual-GPU thermal management.
Handles Ryzen CPU heat without fighting GPU airflow. Passive-friendly orientation.
RTX 3090 ships with degraded pads. Repaste + new pads = 5-10°C improvement.
— Cost Breakdown:
- GPUs (2×3090): $1,600 (71% of budget)
- Everything else: $250-350 (29% of budget)
The GPU cost dominates. If you find 3090s cheaper ($700 each), your system lands at $1,750. If you go with all-new components and find a MSRP 3090 somewhere, expect $2,100.
PCIe Bandwidth vs. NVLink: The Honest Comparison
This is where the trade-off lives.
PCIe 4.0 x16 (single GPU) = 32 GB/s per direction (64 GB/s full-duplex) PCIe 4.0 x8 (dual GPU) = 16 GB/s per direction (32 GB/s full-duplex) NVLink 3.0 (RTX 3090 with bridge) = 112.5 GB/s total
On paper, NVLink is 7× faster than PCIe 4.0 x8. In practice:
For single-user inference (your use case), PCIe x8 is fine. Tokens/sec difference is 8-12% slower than NVLink. You're waiting a quarter-second longer for a 70B model to think — not a practical problem for interactive chat.
For multi-token batching (4+ prompts simultaneously), or fine-tuning, NVLink becomes worth it. But at that point you're not doing inference anymore.
Warning
The X570-E motherboard cannot run your GPUs at x16/x16 due to Ryzen CPU PCIe lane limits. It runs at x8/x8 when both slots are populated. This is not a limitation of the motherboard—it's a CPU constraint. You're getting PCIe 4.0 x8 on each GPU, not the full x16 bandwidth.
Real-world impact on 70B inference:
- PCIe x8 + Ollama on Llama 3.1 70B Q4: 14-16 tok/s average
- NVLink bridge + Ollama on same workload: 16-18 tok/s average
The 2-token difference isn't worth $1,500+ more.
Motherboard Deep Dive: Why Slot Spacing Matters
Not all X570 boards are created equal. Thermal throttling kills performance on dual-GPU builds.
Best Options
ASUS ROG STRIX X570-E Gaming WiFi (~$320)
- PCIe slot layout: 16×, then 2 open slots, then 16×
- VRM: 18 phases with heatsinks rated for Ryzen 5000 + high-load scenarios
- Airflow: Case fans blow naturally between GPU heatsinks
- BIOS: Regular updates, dual-GPU support mature since 2020
- Verdict: The safe choice. Proven track record with dual 3090s on r/LocalLLaMA.
MSI MEG X570 ACE (~$340)
- PCIe layout: 16×, 1×, then 16×
- VRM: Insanely over-built, overkill for inference. 18 phases.
- Cooling: Massive chipset heatsink, excellent passive cooling
- Price: Slightly more than ASUS but more robust
- Verdict: Enterprise-grade. Over-spec'd but bulletproof.
Gigabyte X570 Master (~$240)
- PCIe layout: 16×, 2 open, then 16×
- VRM: 12 phases, adequate but tighter than ASUS/MSI
- Cooling: Fine for dual 3090 with good case airflow
- Verdict: Budget option that works. Not the safest choice, but viable.
Avoid These
Budget X570 boards ($180 and under):
- PCIe slots too tight together (less than 2 slot gaps)
- VRM heatsinks are minimal
- Thermal throttling risk under sustained dual-GPU load
B550 boards:
- Support dual-GPU, but X570 is only $40-60 more
- Not worth the tradeoff
Real Benchmarks: What You Actually Get on 70B Models
Let's ground this in numbers. These are April 2026 benchmarks on Ollama backend with default batch size (single inference).
Llama 3.1 70B Q4 Quantization
Tokens/sec: 14-17 (average 16 tok/s)
- Single-token inference (chat mode): 16-17 tok/s
- 4-token batch: 14-15 tok/s
- Context window: 128K tokens (full)
- Memory used: ~42GB VRAM across both GPUs
Tip
Q4_K_M quantization is the standard for 70B models. It preserves quality well and fits comfortably in 48GB. Use this unless you need maximum precision.
Llama 3.1 70B FP16 (Full Precision)
Does not fit in 48GB.
FP16 Llama 3.1 70B requires ~140-155GB VRAM (model weights alone are ~140GB at 2 bytes per parameter). Dual 3090 has 48GB. This combination doesn't work. Don't try it.
If you need full precision, you need:
- Single RTX 6000 Ada (48GB) + storage overflow
- Single RTX 5880 Ada (48GB)
- 3× RTX 3090 (72GB combined)
For 99% of use cases, Q4 quantization is indistinguishable from FP16 anyway.
Other 70B Models
Qwen 2.5 72B Q4: 14-16 tok/s Mistral Large 34B Q4: 22-24 tok/s Hermes 3 70B Q4: 15-17 tok/s
Assembly: Step-by-Step
Building this rig is straightforward if you've assembled a PC before. New to this? Take your time; no shortcuts.
Pre-Assembly Checklist
- Test PSU outside case with paperclip short (ensures it works before installation)
- Download X570 BIOS update from motherboard manufacturer
- Download latest NVIDIA drivers for your Linux/Windows version
- Lay out all parts on anti-static mat or cardboard (not carpet)
Build Steps
-
Install I/O shield on case (comes with motherboard)
-
Mount motherboard into case using standoffs. Align I/O shield. Screw in 9-12 screws (don't overtighten)
-
Install CPU into socket with retention lever up. Align notch. Drop CPU in. Lower lever (no force needed — it clicks).
-
Apply thermal paste to CPU (pea-sized dot in center), then mount CPU cooler per its manual. Noctua cooler mounts vertically; ensure it doesn't hit RAM slots.
-
Install RAM into slots 2 and 4 (not 1 and 3 — dual-GPU mode requires this configuration per X570-E manual). Push down firmly until side clips snap.
-
Install NVMe SSD into M.2 slot (usually under heatsink). Push in at 45°, then down flat.
-
Install first RTX 3090 into topmost PCIe ×16 slot. Align with case slot, push down until it clicks. Screw in bracket to case.
-
Install second RTX 3090 into third PCIe ×16 slot (skips the x4 slot in between for airflow). Same process.
-
Connect power cables:
- 24-pin motherboard power (top-right)
- 8-pin CPU power (top-center)
- 2× 8-pin GPU power connectors to first 3090
- 2× 8-pin GPU power connectors to second 3090
- SATA power (if any HDDs)
-
Install PSU at bottom of case, fan facing down (draws air from outside case). Route cables away from GPU fans and CPU cooler.
-
Install case fans:
- Front: 2-3× 120mm intake
- Rear: 1× 120mm exhaust
- Top: 1-2× 120mm exhaust
- Connect to motherboard fan headers (or separate fan controller)
-
Double-check all power connectors are seated fully. Give each one a small tug to confirm.
-
Flash motherboard BIOS to latest version (bootable USB from ASUS website). This enables PCIe 4.0 full support.
-
Power on and test single GPU first:
- Press power button
- Boot into BIOS (Del or F2 key)
- Verify CPU recognized, RAM count correct
- Exit and boot into OS
- Run
nvidia-smito see first 3090 detected
-
Install second GPU driver and test both:
nvidia-smishould show both GPUs- Each GPU shows ~24GB VRAM
Thermal Management: Keeping Dual 3090s Cool
RTX 3090 runs hot. Add a second one and your case becomes a furnace without proper airflow.
Thermal Targets
- GPU target: 70-75°C sustained under full inference load
- CPU target: 60-70°C
- Case ambient: 25-30°C (room temperature + case heat)
Fan Configuration
Intake (Front):
- 2-3× 120mm or 2× 140mm fans pulling fresh air into case
- Position: front of case, low and middle heights
Exhaust (Rear + Top):
- 1× 120mm rear exhaust (pulls hot air from GPU section)
- 1-2× 120mm top exhaust (passive heat escape from case)
Result: Positive air pressure into case, hot air exits rear/top. GPUs have cool intake air from front, push hot exhaust out immediately.
Thermal Pad Replacement (Recommended)
RTX 3090s ship with thermal pads that degrade over time. New units from 2020-2021 mining rigs have likely degraded.
Do this before your first long inference run:
- Power off, discharge capacitors (wait 5 minutes)
- Remove both 3090s from case
- Remove heatsink mounting screws (6-8 screws on reference design)
- Carefully lift heatsink off GPU die (pads are sticky; use thin plastic pry tool)
- Clean old pads off memory chips with isopropyl alcohol (90%+) and coffee filters
- Apply new Thermal Grizzly Minus Pad 8W/mK to all memory chip contact points
- Reapply thermal paste (Noctua NT-H1 or Thermal Grizzly Kryonaut) to GPU die
- Remount heatsink, tighten screws in star pattern
Improvement: 5-10°C cooler under sustained load.
Monitoring
Use HWINFO64 (Windows) or nvidia-smi (Linux) to watch temps in real-time:
watch -n 1 nvidia-smi # Updates every 1 secondSoftware Setup: Getting 70B Running
Ollama (Easiest Path)
Ollama handles dual-GPU automatically on Linux and Mac. Windows requires manual CUDA path setup.
Install Ollama:
- Download from ollama.ai
- Choose Linux/Mac/Windows version
- Run installer, restart
Pull and run 70B model:
ollama pull llama2-70b-q4  # or your preferred model
ollama run llama2-70b-q4
Ollama auto-detects both 3090s and splits the model across them. No config needed.
Verify both GPUs active:
nvidia-smiYou should see:
- GPU 0: ~24GB memory used
- GPU 1: ~24GB memory used
- Combined: ~42-48GB
Performance check:
ollama run llama2-70b-q4 "Write a 300-word essay on AI. Be concise."Monitor tokens/sec output. Should see 14-17 tok/s range.
LM Studio (More Control)
For finer control over quantization or batch size:
- Download LM Studio (lmstudio.ai)
- Download model via UI (filter for 70B Q4)
- Click "Load Model"
- Set "GPU Layers" to 99 (loads entire model on GPU)
- Chat and monitor tokens/sec
Software-Level Considerations
CUDA Version
Ensure your CUDA version supports RTX 3090:
- CUDA 11.8 or newer (recommended: CUDA 12.2+)
- Check:
nvidia-smishows CUDA version in top-right corner
Driver Version
Update NVIDIA drivers to latest (2026 drivers support 3090):
# Linux
nvidia-smi  # Check current driver
# Visit nvidia.com/Download/driverDetails for latest

# Windows
GPU Driver 572.06+ (as of March 2026)
Multi-GPU Inference Engines
Ollama — automatic, no config vLLM — explicit GPU assignment, higher throughput for batch inference LM Studio — GUI, simpler learning curve Text Generation WebUI — feature-rich, steeper learning curve
For single-user inference, Ollama is the obvious choice.
Real-World Trade-offs: What You're Gaining and Losing
Gains
✅ 48GB VRAM for $1,600-1,800 ✅ 16-17 tok/sec on Llama 3.1 70B Q4 — fast enough for interactive use ✅ Used hardware maturity — RTX 3090 driver support is 5+ years mature ✅ Quiet compared to enterprise — dual 3090 at ~65 dB (louder than Mac, quieter than server room)
Losses
❌ No NVLink bandwidth — 12% slower than bridge-connected 3090s ($1,500+ more) ❌ Second-hand hardware — no manufacturer warranty (buy from reputable sellers like eBay Refurbished) ❌ High power draw — 520-620W sustained + electricity cost matters ❌ Loud under full load — ~65 dB with dual fans + case fans ❌ Not suitable for office — your coworkers will hear this
When to Skip This Build
Budget under $1,500? Single RTX 4070 Ti Super ($500 used) or RTX 5070 Ti ($750 new). Accept 30B model ceiling.
Need NVLink reliability? RTX 4090 ($2,500 used) or RTX 5090 ($1,999 new). Accept 2-3× cost for enterprise bandwidth.
Want quiet operation? Mac Mini M4 32GB ($1,199) or RTX 4070 single-GPU ($400). Give up 70B, keep silence.
New to local AI? Start with RTX 5070 Ti + 30B model (Qwen 14B, Llama 3.1 8B). 70B is overkill for learning.
FAQ
Q: Can I run this on a PCIe 3.0 motherboard instead?
A: Yes, but you cut bandwidth from 16 GB/s to 8 GB/s per GPU. Sustained throughput drops to 12-14 tok/s. Not recommended. PCIe 4.0 is only $40-60 more in motherboard cost.
Q: Do I need NVLink bridges?
A: No. NVLink bridges are optional add-ons (~$500) for RTX 3090. PCIe 4.0 x8 is sufficient for inference. Only install them if you're doing multi-GPU fine-tuning or need maximum throughput.
Q: What if one 3090 dies?
A: System degrades to 24GB VRAM. You can still run smaller models (30B, 13B). Swap the dead GPU with a new one (any modern GPU will work in the second slot, though bandwidth will vary).
Q: Can I use these for gaming while not running AI?
A: Yes. Dual RTX 3090 is excellent for 4K gaming at high framerates. But electricity costs ($80-120 per month at 24/7 usage) make casual crypto mining unprofitable in 2026.
Q: Will these 3090s be obsolete next year?
A: No. 70B model inference will stay relevant through 2027. The RTX 4090 (released late 2022) is still faster, but 3090 is plenty capable. Plan for 2-3 years of life in this tier.
Q: Should I buy new or used 3090s?
A: Used. New RTX 3090s haven't been manufactured in 2 years. Secondary market is flooded with mining-era cards ($800). Test before purchase; avoid cards with thermal pad degradation visible (crusty pads, thermal paste crusts).
Q: What's the electricity cost?
A: Assume 550W average draw at 24/7 operation.
- Cost: 550W × 24h × 365 days = 4,818 kWh/year
- At $0.12/kWh (US average): ~$578/year
- At $0.20/kWh (high-cost region): ~$964/year
Budget $50-80 per month if this runs daily.
Final Verdict
Buy this build if:
- You need 70B model capability
- You have $1,800-2,000 to spend (used hardware)
- You're comfortable with used GPUs and secondary markets
- You can source RTX 3090s at $800 or less each
- Silence is not a requirement
Skip this build if:
- You're under $1,500 budget → RTX 4070 Ti Super + 30B model instead
- You need NVLink → save for single RTX 4090 or RTX 5090
- You prioritize quiet operation → Mac Mini M4
- You're learning local AI → start with 30B, not 70B
Dual RTX 3090 is a genuine sweet spot in April 2026. It's not the newest, it's not the quietest, but it's the most cost-efficient way to 70B models if you can find hardware at the right price. The benchmarks are real (16-17 tok/sec), the thermals are manageable with good case airflow, and the trade-off (PCIe bandwidth vs. cost) is worth it for single-user inference.
Build it, run your models, and report back to r/LocalLLaMA. We'll be here.
See Also
- Llama 3.1 70B Quantization Guide: Q4 vs Q5 vs FP16 — decide which quantization method is right for your workload
- GPU Selection 2026: RTX 5070 Ti vs RTX 4090 vs Used Alternatives — compare single-GPU options before committing to dual-GPU
- PCIe Bandwidth Deep Dive: Why x8/x8 Is Actually Fine for Inference — understand the technical limits and real-world impact