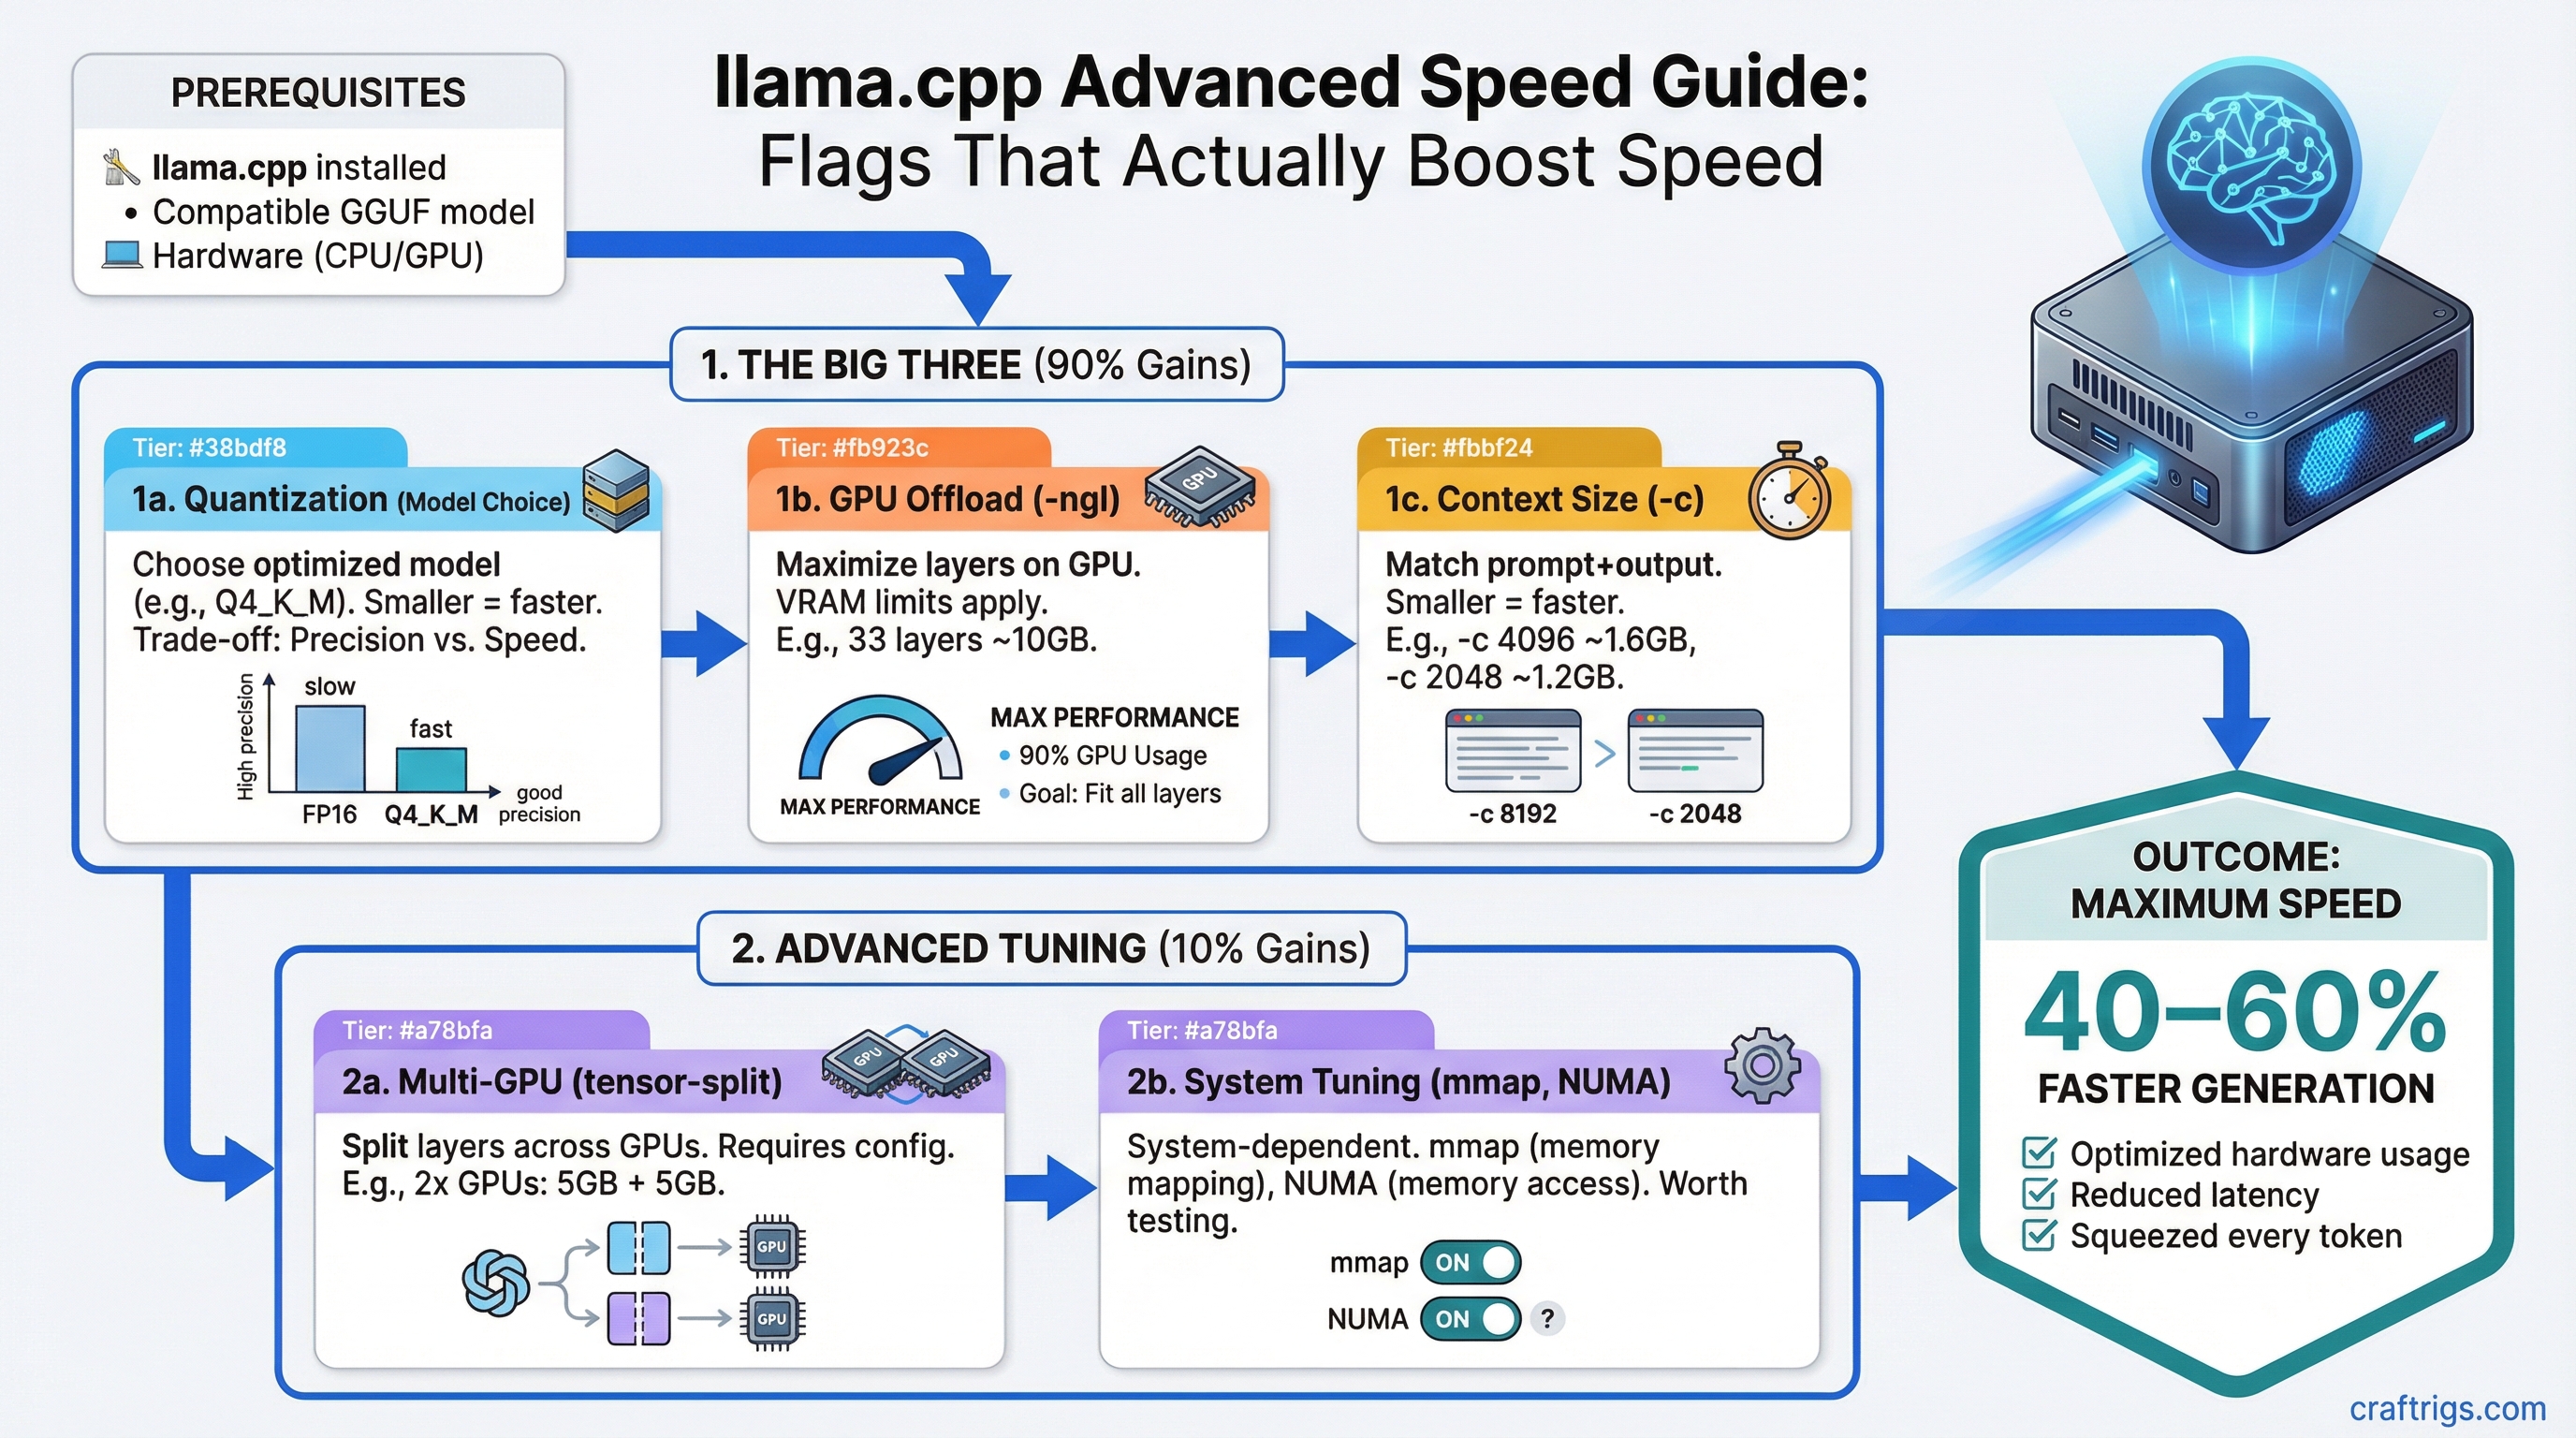
TL;DR: The three flags that matter most in llama.cpp are -ngl (GPU layers), -c (context size), and the quantization you choose. Get those right and you've captured 90% of the performance available from your hardware. This guide covers all three, plus multi-GPU splitting and NUMA tuning for power users.
The Flags That Actually Matter
llama.cpp has dozens of command-line flags. Most of them you'll never touch. Here are the ones that directly affect performance.
-ngl: GPU Layer Offloading
This is the single most important flag. It controls how many model layers run on your GPU versus your CPU.
./llama-server -m model.gguf -ngl 33-ngl 33 means "put 33 layers on the GPU." A typical 7-8B model has 32-33 layers. A 70B model has 80 layers.
The rule: Set -ngl to the maximum number of layers your VRAM can hold. If you run out of VRAM, llama.cpp crashes. If you set it too low, layers spill to CPU and performance tanks.
How to find the right number:
- Start with all layers on GPU (
-ngl 999-- it'll cap at the model's max) - If it crashes with an out-of-memory error, reduce by 5 layers and try again
- Keep reducing until it fits
- Run
nvidia-smiwhile the model is loaded to check VRAM usage -- leave ~500 MB headroom for context processing
The performance cliff: Partially offloading layers to CPU doesn't scale linearly. If 10% of layers are on CPU, you might see 40-50% slower generation, not 10% slower. The CPU becomes a bottleneck because every token generation must pass through those CPU layers. This is why VRAM matters so much -- you want 100% GPU offload whenever possible.
-c: Context Size
Context size determines how much text the model can process at once, measured in tokens (roughly 4 characters per token).
./llama-server -m model.gguf -ngl 33 -c 8192Default: 2048 tokens in most builds. Many models support 8192, 16384, 32768, or even 128K tokens.
The VRAM cost: Context isn't free. Every additional 1K tokens of context uses additional VRAM for the KV cache (the key-value cache that stores attention state). The exact amount depends on model architecture, but rough estimates:
- 8B model at 4K context: ~200 MB for KV cache
- 8B model at 8K context: ~400 MB
- 8B model at 32K context: ~1.6 GB
- 70B model at 4K context: ~1.2 GB
- 70B model at 32K context: ~10 GB
This is on top of the model weights themselves. So if your 8B q4 model uses 5 GB VRAM and you set -c 32768, you need 5 GB + 1.6 GB = 6.6 GB total. On a 6 GB GPU, that won't fit.
Practical advice: Start with -c 4096. If you need more context (long documents, multi-turn conversations), increase to 8192 or 16384. Only go to 32K+ if you have VRAM to spare and actually need to process long inputs.
-t: Thread Count
Controls CPU thread count, mainly affecting prompt processing speed and CPU-offloaded layers.
./llama-server -m model.gguf -ngl 33 -c 4096 -t 8For fully GPU-offloaded models (all layers on GPU): -t barely matters for generation speed. It helps with prompt processing (the initial "thinking" phase before generation starts). Set it to your physical core count.
For partially CPU-offloaded models: -t makes a big difference. Set it to your number of physical cores (not logical/hyperthreaded cores). On a 6-core/12-thread CPU, use -t 6, not -t 12. Hyperthreading doesn't help with llama.cpp's matrix operations and can actually hurt.
Finding your physical core count:
# Linux
lscpu | grep "Core(s) per socket"

# macOS
sysctl -n hw.physicalcpu

# Windows (PowerShell)
(Get-CimInstance Win32_Processor).NumberOfCores
Quantization Types: What to Use and When
Quantization compresses model weights from their original 16-bit floating point down to fewer bits per weight. Less bits = smaller file = less VRAM = slightly lower quality. The naming convention (Q4_K_M, Q5_K_S, etc.) tells you the bit depth and method.
The Quantization Lineup
Here's what each quantization means and when to use it, ordered from most compressed to least:
Q2_K (~2.5 bits per weight) Aggressive compression. Noticeable quality loss. Only use this if you're trying to run a model that's way too big for your VRAM and you accept the trade-off. A Q2_K 70B model might fit in 24 GB VRAM but will produce worse output than a Q4 13B model on the same hardware.
Q3_K_S / Q3_K_M / Q3_K_L (~3.0-3.5 bits) Still aggressive. Quality degradation is visible in reasoning tasks. Acceptable for simple tasks like summarization or basic Q&A. The S/M/L suffixes mean Small/Medium/Large -- they indicate how many layers get slightly higher precision. Q3_K_L is meaningfully better than Q3_K_S.
Q4_K_S / Q4_K_M (~4.0-4.5 bits) The sweet spot for most users. Q4_K_M is our default recommendation. Quality loss is minimal for most tasks. The difference between Q4_K_M and the original 16-bit model is hard to notice in conversation. File size is roughly 60% smaller than the original.
This is what Ollama uses by default for most models, and for good reason.
Q5_K_S / Q5_K_M (~5.0-5.5 bits) Slightly better quality than Q4, about 20-25% larger files. Worth it if you have the VRAM headroom. The quality improvement over Q4_K_M is subtle but measurable in benchmarks, especially on reasoning and coding tasks.
Q6_K (~6.5 bits) Near-original quality. About 50% larger than Q4_K_M. Use this if you have plenty of VRAM and want the best quality without going full precision. On a 24 GB GPU, running an 8B model at Q6_K is smart because you have the room.
Q8_0 (~8 bits) Essentially lossless compared to the original model. About twice the size of Q4_K_M. Use for benchmarking or when VRAM isn't a constraint. On Apple Silicon with 64+ GB unified memory, this is practical even for large models.
F16 (16 bits, no quantization) The original weights. Huge files, maximum quality. Only useful for research or as a baseline for comparing quantization quality. A 7B F16 model is ~14 GB.
Picking the Right Quantization
Decision framework:
- How much VRAM do you have available (after reserving ~500 MB for context)?
- Pick the largest model that fits at Q4_K_M
- If you have VRAM left over, upgrade the quantization to Q5_K_M or Q6_K
- Never downgrade to Q3 or Q2 unless you've already tried a smaller model at Q4
Example: You have an RTX 3060 12 GB and want to run a model.
- 8B Q4_K_M = ~5 GB (fits easily, room for 8K+ context)
- 8B Q6_K = ~6.5 GB (still fits with good context room)
- 8B Q8_0 = ~8.5 GB (fits but limits context to ~4K)
- 13B Q4_K_M = ~7.5 GB (fits with moderate context)
- 13B Q6_K = ~10 GB (tight, limited context)
Go with the 13B Q4_K_M -- you get a smarter model with plenty of context room. A bigger model at Q4 almost always beats a smaller model at Q8. For detailed GPU-specific guidance, check best GPUs for local LLMs.
Advanced: NUMA Binding for Multi-Socket Systems
NUMA (Non-Uniform Memory Access) matters if you're running on a workstation or server with multiple CPU sockets. Most consumer desktops have one socket and can skip this section.
./llama-server -m model.gguf -ngl 0 --numa distributeWhat NUMA does: On multi-socket systems, each CPU socket has "local" RAM that's fast to access and "remote" RAM (attached to the other socket) that's slower. Without NUMA awareness, llama.cpp might allocate memory that's physically far from the CPU processing it, adding latency.
The --numa flag options:
distribute-- spreads work across NUMA nodes (good for CPU-only inference with many cores)isolate-- pins to a single NUMA node (good if one node has enough RAM)numactl-- uses external numactl for fine-grained control
When it matters: Only for CPU-heavy workloads on multi-socket servers. If your model is fully GPU-offloaded, NUMA is irrelevant.
Advanced: Multi-GPU Tensor Splitting
If you have two or more GPUs, llama.cpp can split model layers across them using the --tensor-split flag.
./llama-server -m model.gguf -ngl 80 --tensor-split 3,1How it works: --tensor-split 3,1 means "distribute layers in a 3:1 ratio." If you have an RTX 4090 (24 GB) and an RTX 3060 (12 GB), you'd use --tensor-split 2,1 to put roughly twice as many layers on the larger card.
The key insight: Multi-GPU inference is limited by the slowest GPU and the interconnect bandwidth. Two identical GPUs connected via PCIe 4.0 x16 will not give you 2x speed. You'll see maybe 1.3-1.6x improvement because data must transfer between GPUs every layer.
NVLink vs PCIe: NVLink (a high-bandwidth direct connection between NVIDIA GPUs) provides much better multi-GPU scaling than PCIe. But NVLink is only available on professional cards (RTX A-series, H100, etc.) and the RTX 3090/4090 with specific NVLink bridges. Most consumer setups use PCIe.
Practical multi-GPU advice:
- Two identical GPUs is the simplest setup -- use
--tensor-split 1,1 - Mismatched GPUs work but the split ratio needs tuning
- More than 2 GPUs on PCIe hits diminishing returns fast
- If building a multi-GPU rig from scratch, see our dual-GPU LLM build guide
Batch Size Tuning
The -b flag controls the batch size for prompt processing (the phase where the model reads your input before generating a response).
./llama-server -m model.gguf -ngl 33 -b 512Default: 512. Higher values (1024, 2048) process long prompts faster but use more VRAM. Lower values (128, 256) save VRAM but slow prompt processing.
When to change it:
- If you're feeding very long documents to the model, increase to 1024 or 2048
- If you're running out of VRAM during prompt processing (not during generation), decrease to 256 or 128
- For short back-and-forth conversations, the default is fine
Putting It All Together
Here's a complete command for common scenarios:
8B model on RTX 3060 12GB (optimized):
./llama-server -m llama-3.1-8b-q4_k_m.gguf \
  -ngl 33 -c 8192 -t 6 -b 512 \
  --host 0.0.0.0 --port 8080
70B model on RTX 4090 24GB (partial offload):
./llama-server -m llama-3.1-70b-q4_k_m.gguf \
  -ngl 40 -c 4096 -t 8 -b 256 \
  --host 0.0.0.0 --port 8080
70B model on dual RTX 3090:
./llama-server -m llama-3.1-70b-q4_k_m.gguf \
  -ngl 80 --tensor-split 1,1 -c 4096 -t 8 \
  --host 0.0.0.0 --port 8080
8B model on Apple Silicon M4 Max 64GB:
./llama-server -m llama-3.1-8b-q8_0.gguf \
  -ngl 33 -c 32768 -t 12 \
  --host 0.0.0.0 --port 8080
For real-world performance numbers across these configurations, see our local LLM speed test across 20 GPU setups.
When to Use llama.cpp Directly vs. Ollama
If you've read this far, you're a power user. But you might still be better off with Ollama for daily use and llama.cpp for benchmarking and experimentation. Ollama exposes the most important flags through its Modelfile system and API, and for 90% of tasks, that's enough.
Use raw llama.cpp when you need:
- Specific quantization variants not in Ollama's library
- Precise tensor split ratios for multi-GPU
- NUMA binding
- Bleeding-edge features from the latest commits
- Reproducible benchmarks with full control over every variable
For a full comparison of when to use which tool, see llama.cpp vs Ollama vs LM Studio.
Flags and behavior based on llama.cpp commit b4917, March 2026. The project moves fast -- check the GitHub repo for latest changes.