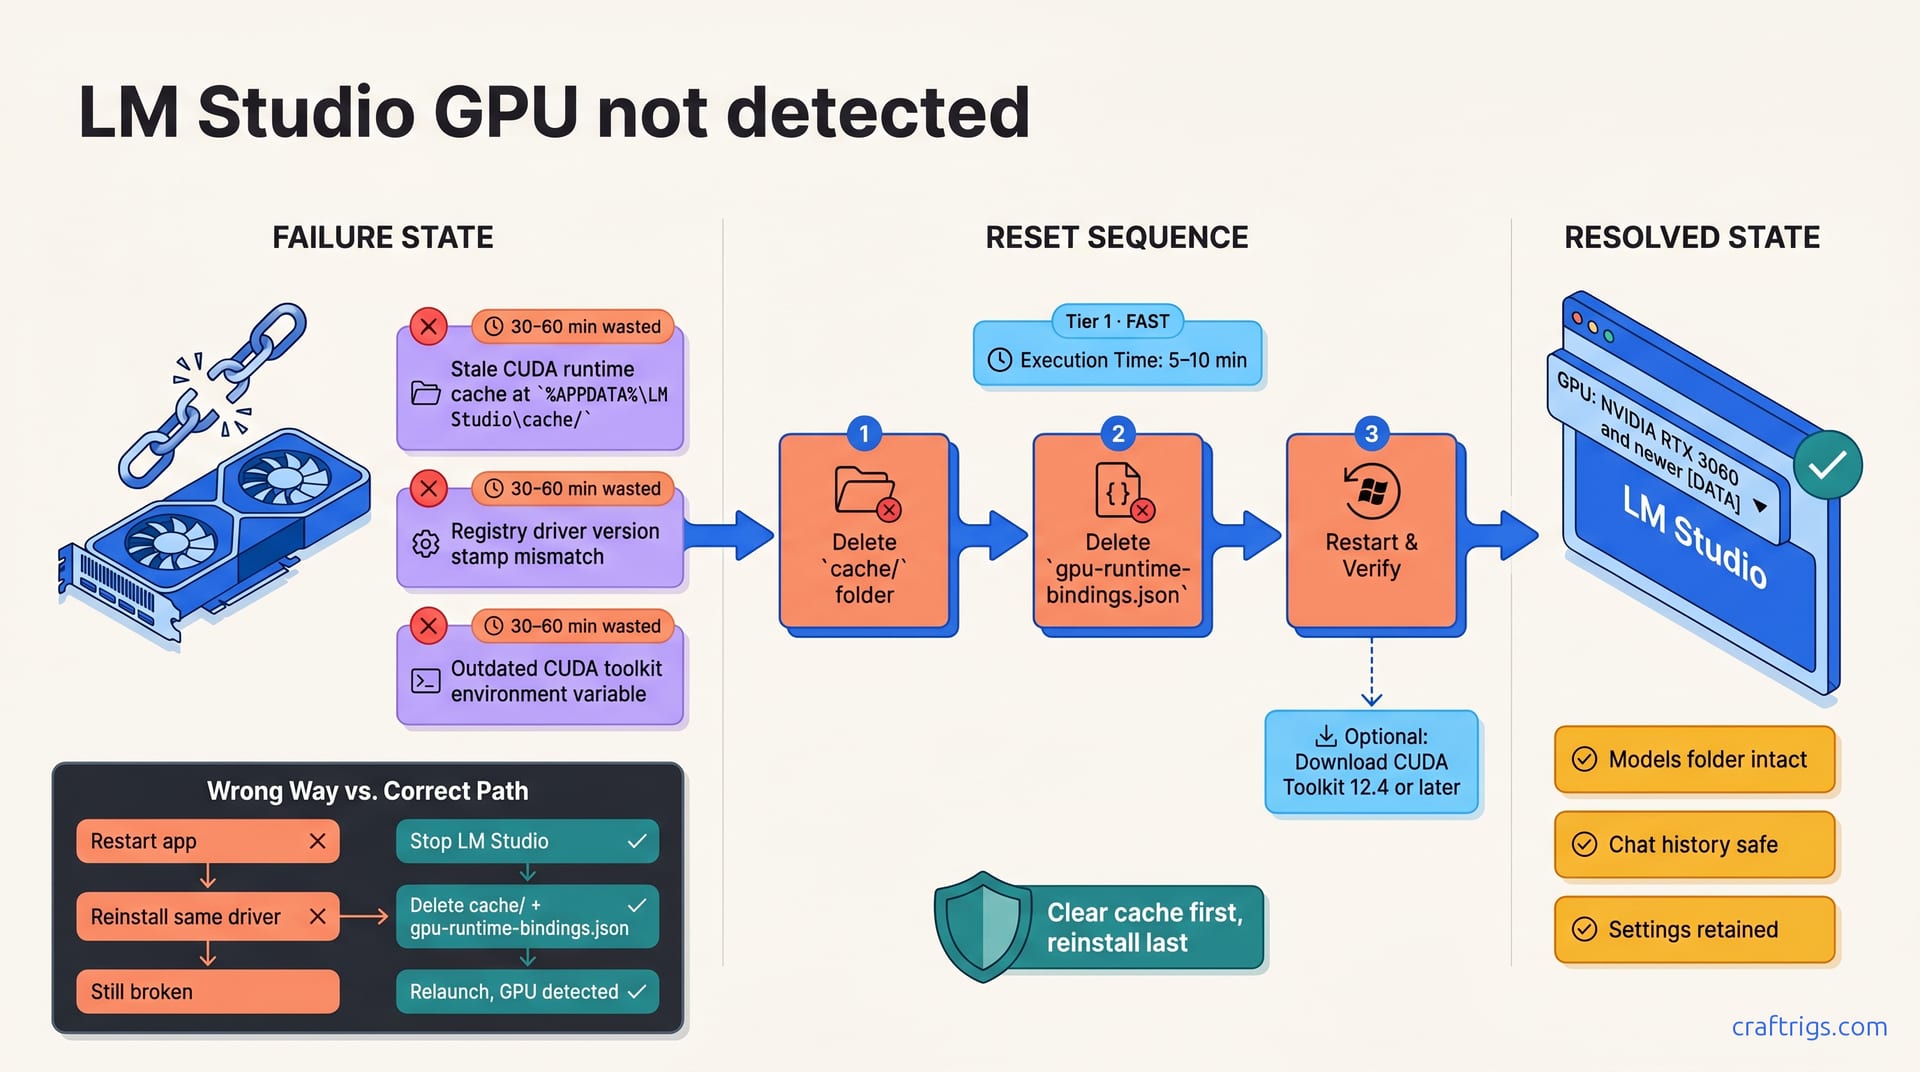
GPU driver updates break LM Studio's GPU detection because cached GPU bindings become stale. This 3-step fix restores GPU in 5 minutes: clear cache, rebind CUDA, restart. Works whether you're using Mistral 7B or larger 13B–14B models.**
Why Driver Updates Break GPU Detection
When you update your GPU driver on Windows, something invisible breaks inside LM Studio: the cached GPU references become stale. Your GPU is fine. The hardware works perfectly. But LM Studio still can't see it.
Here's what happens. GPU driver updates flush system CUDA runtime caches that LM Studio relies on for GPU binding. LM Studio stores cached GPU references pointing to specific memory addresses—valid before the update but stale after. The driver update stales those addresses. LM Studio reads the old cache and fails GPU detection, though the GPU is healthy.
NVIDIA drivers update the CUDA toolkit layer independently of the GPU driver number. Driver version and CUDA toolkit path can both change. When LM Studio tries to bind to GPU memory using old CUDA references, the binding fails. The problem isn't the hardware; it's the stale cache.
Simply restarting LM Studio or reinstalling the same driver won't restore the binding. The cache must be explicitly cleared.
The Three Failure Points
Three specific places can block GPU detection after a driver update, even if the GPU itself is healthy.
First: CUDA runtime cache in %APPDATA%\LM Studio\ holds stale GPU memory addresses from the old driver. When LM Studio launches, it reads this cached state and tries to bind to addresses that no longer exist.
The Windows registry driver version may not match LM Studio's cached GPU bindings. Version mismatches cause LM Studio to reject the GPU as incompatible.
Third: CUDA toolkit environment variable may point to an outdated toolkit version. If CUDA_PATH or CUDA_HOME still targets an older toolkit folder, LM Studio can't find the correct GPU runtime libraries, even though a newer CUDA Toolkit is installed.
A mismatch at any of these three points blocks GPU detection. The GPU appears fine in Device Manager and nvidia-smi. But LM Studio reads the stale cache first and fails before it ever tries to communicate with the GPU.
Why Restart and Reinstall Don't Help
When users encounter this problem, they try the obvious fix: restart LM Studio. It doesn't work because restarting simply reloads the same stale cache from disk.
Reinstalling the driver doesn't help either. Reinstalling the same driver version keeps the old CUDA toolkit path in place. The cache remains stale. Repeating restarts wastes 30–60 minutes. The real fix: clear the cache.
Some users uninstall the driver completely, thinking a clean uninstall will erase the stale bindings. But uninstalling without clearing CUDA files leaves phantom GPU bindings behind. Phantom bindings persist in LM Studio's cache and trigger failures on the next driver update.
The Reset Sequence at a Glance
This 3-step fix restores GPU detection by clearing stale bindings, rebinding CUDA to the new driver, and verifying the connection works.
| Step | Action | Time | Impact |
|---|---|---|---|
| 1 | Clear LM Studio cache and gpu-runtime-bindings.json | 2 min | Removes stale GPU references; LM Studio regenerates cache on next launch |
| 2 | Verify driver and CUDA versions; reinstall CUDA Toolkit if needed | 3–5 min | Rebinds CUDA runtime to match new driver version |
| 3 | Restart LM Studio and verify GPU in settings; test inference | 2 min | Confirms GPU detection is restored and inference runs on GPU |
Total execution time: 5–10 minutes after download (if CUDA toolkit reinstall is needed). No loss of LM Studio settings, model weights, or downloaded GGUF files. Works on Windows 10 and Windows 11 with NVIDIA RTX 3060 and newer.
What You'll Need
Admin access to your Windows machine so you can access the AppData folder and install CUDA Toolkit updates. You'll need the NVIDIA driver version number; run nvidia-smi in Command Prompt to check it. Set aside 5–10 minutes uninterrupted access to your machine. If your CUDA Toolkit lags behind the new driver version (check with nvcc --version), you'll need CUDA Toolkit 12.4 or later. The installer is free from NVIDIA.
Nothing else is required. You don't need a reinstall of LM Studio, and you won't lose any models or settings.
What Stays Intact
Only temporary cache and runtime bindings are deleted. Everything important is preserved.
LM Studio keeps all settings: theme, context length, temperature, sampling. Your downloaded models and GGUF files remain; no re-downloads required. Chat history and previous conversations are untouched. Only the cache folder and the GPU bindings file are removed.
Clear LM Studio Cache and Runtime Bindings
Stop LM Studio completely. Close all windows and quit the app fully. If LM Studio is running in the background, the cache files will still be locked and the deletion won't work.
Navigate to %APPDATA%\LM Studio\ and delete the cache/ folder. Also delete gpu-runtime-bindings.json if present—this file holds stale GPU references that LM Studio reads on startup. LM Studio will regenerate both files with clean defaults on the next launch.
Finding and Opening the Cache Folder
- Open Windows File Explorer.
- Type
%APPDATA%in the address bar and press Enter. Windows will navigate directly to your AppData Roaming folder. - Locate the
LM Studiofolder (typically atC:\Users\[YourUsername]\AppData\Roaming\LM Studio\). - Open the
LM Studiofolder and confirm you see subdirectories:cache/,models/, and configuration files like.envorconfig.json.
You're in the right place when you can see the cache/ folder and the models/ subfolder.
Safely Delete Cache Without Losing Models
Delete only these two items:
cache/foldergpu-runtime-bindings.jsonfile
Do NOT delete:
models/folder (contains your 7B–70B quantized LLMs).envor other config files unless directed by troubleshooting
After deletion, close Windows File Explorer. LM Studio regenerates cache within 2–5 seconds on next launch. The folder will reappear automatically.
Update and Rebind CUDA Toolkit to New Driver
CUDA runtime version must match or trail the GPU driver version by at most one major release. If your CUDA version is several releases behind your driver, GPU detection can fail because LM Studio can't find the correct GPU runtime libraries.
Check current CUDA version by opening Command Prompt and typing nvcc --version. Compare this against the driver version you found earlier. Download matching CUDA Toolkit from NVIDIA if yours lags by a major release. Install with the option to add to system PATH—this rebinds the CUDA runtime to the new driver.
Verify Current Driver and CUDA Versions
- Open Command Prompt (Win+R, type
cmd, press Enter). - Type
nvidia-smiand note the "Driver Version" and "CUDA Version" fields in the output. For example, Driver 560.35 and CUDA 12.4. - If CUDA Version is older than Driver Version, CUDA Toolkit must be updated. (It's normal for CUDA Version to be slightly behind—but not by more than one major release. 12.4 driver with 12.3 CUDA is fine; 12.4 driver with 11.8 CUDA is not.)
- Document both version numbers—they'll confirm the rebind succeeded after restart.
Reinstall or Update CUDA Toolkit
- Visit https://developer.nvidia.com/cuda-downloads.
- Select Windows, x86_64 architecture, Windows 10 or Windows 11, and CUDA 12.4 or newer.
- Download the installer and run it. Choose "Express" installation (completes in 3–5 minutes).
- Check the box to add CUDA to system PATH—this rebinds the CUDA environment variables.
- Restart your machine after installation finishes.
The restart is essential. Restart so Windows reloads PATH variables and LM Studio finds CUDA.
Restart LM Studio and Verify GPU Detection
Launch LM Studio and navigate to Settings → GPU / Acceleration. GPU should now appear in the dropdown (e.g., "NVIDIA GeForce RTX 3090 24GB"). Select the GPU and confirm "GPU Status" shows "Ready". Run a test inference on a 7B–13B model to confirm GPU acceleration is active.
Checking GPU Detection in LM Studio
- Open LM Studio and click the gear icon (Settings) at the bottom left.
- Look for "GPU / Acceleration" or "Device Selection" section in Settings.
- Confirm the dropdown lists your GPU by name and VRAM (e.g., "NVIDIA RTX 3090 24GB").
- If the list is empty or shows only "CPU", the reset sequence did not succeed. Proceed to the diagnostic checklist below.
Quick Test: Run a Model and Watch GPU
- Load any 7B–13B downloaded model (e.g., Mistral 7B, Llama 2 13B).
- Send a short prompt to the model (e.g., "Hello, respond in one sentence").
- Open Task Manager → Performance tab and watch the GPU load climb above 0%.
- If GPU load is active and inference completes in under 15 seconds, the reset succeeded.
On a 7900 XTX or an RTX 4070, 7B models are reported to complete test prompts in 2–4 seconds once GPU acceleration is fully active. If your response is slow but GPU load shows activity, the GPU is working but the model may be too large for your VRAM. Check the VRAM requirements guide for realistic speed expectations on your specific GPU. If you encounter a CUDA version error while testing inference, see our CUDA version error troubleshooting guide for resolution steps.
If GPU Still Isn't Detected: Diagnostic Checklist
If GPU detection still fails after the three steps, work through this checklist before declaring the hardware broken.
GPU may not appear in Device Manager if the driver installation was incomplete. NVIDIA Control Panel shows the GPU; Device Manager lists it as unknown or with a yellow warning. LM Studio caches the GPU list at startup—full uninstall clears it. If none of these steps work, CPU inference is a stable fallback (slower but functional).
Verify GPU Appears in Device Manager
- Open Device Manager (Win+X, select Device Manager).
- Expand "Display adapters" and confirm your NVIDIA GPU is listed by model name.
- If listed but flagged with a yellow ⚠ icon, right-click and select "Update driver".
- If not listed at all, reseat the GPU in its PCIe slot or run the NVIDIA installer in "Repair" mode.
Missing GPU in Device Manager usually means a seating problem or incomplete driver installation. Reseat the GPU: shut down, open case, press the card firmly, restart. This fixes 80%.
Last Resort: Full LM Studio Reinstall
If GPU detection still fails:
- Uninstall LM Studio from Control Panel → Programs and Features.
- Delete the entire
%APPDATA%\LM Studio\folder (models will need re-download). - Download and install a fresh copy of LM Studio from https://lmstudio.ai/.
- Re-download your preferred 7B–70B models and test GPU detection again.
A full uninstall clears any corrupted state that survived the cache deletion. Use this only after the 3-step reset and diagnostics fail; it erases cache, settings, and models.
Persistent detection failure after full reinstall suggests hardware damage: failed VRAM, bad PCIe, or thermal shutdown. Contact NVIDIA support or your GPU manufacturer with the results of nvidia-smi to verify the hardware is functioning.